
This article provides the necessary brief information to assist the site engineers/field engineers/ construction engineers during the first installation and connection of piping with the relevant rotating machinery.
Preservation
During operations, the equipment should be preserved and protected in compliance with the supplier’s procedure. In order to prevent any grit and foreign matters from entering, make sure that all paths and openings are properly blocked up and sealed. Antidust covers should remain installed until the final alignment is completed.
Alignment
Once the skid or module has been leveled and grouted, the machines should be aligned according to specification, after this operation, they will be available for piping installation (including instrumentation and electrical connection piping).
Machine leg anchor bolts should be tightened and the relevant washer (Belleville washer) should be locked in order to anchor the machine to the skid. The axial and transversal keys should be fixed in position, but no fixing welding, or pinning shall be carried out.
Piping
Electrical Insulation
Do not perform any welding operations on pipes connected to the foundation, machinery base plates, or the machinery itself, without the proper direct grounding connection with the welding transformer. In order to avoid any damage to the machinery supports caused by dispersing current, grounding cables should not be connected to any part of the rotating machinery (base plate, pedestal, control circuit apparatus, etc.).
Temporary Supports
During piping construction, pipes can be temporarily connected to the machine. Pipes should be properly supported (with temporary supports) in order to avoid stress or interactions during the alignment operations. While those activities are carried out the machine must be firmly locked in position.
Piping Completeness
Before connecting pipes to the machine and checking the final alignment, all operations on piping systems have to be completed. Including the following activities: pressure tests, washing, air flushing, and permanent support installation (fixed, sliding, and elastic supports). While those operations are carried out, piping has to remain always disconnected and insulated from the machine.
Permanent Supports
Pipes have to be connected to permanent supports in order to be installed in the correct final position so that elastic supports are pre-loaded at the required load (cold position) with assembled pins.
Pipes should be sustained by supports so that connection flanges are within the coupling tolerances.
If the customer is in charge of the piping supply, he has to provide all the relevant information.
Flange fitting tolerances between machine and piping
Parallelism
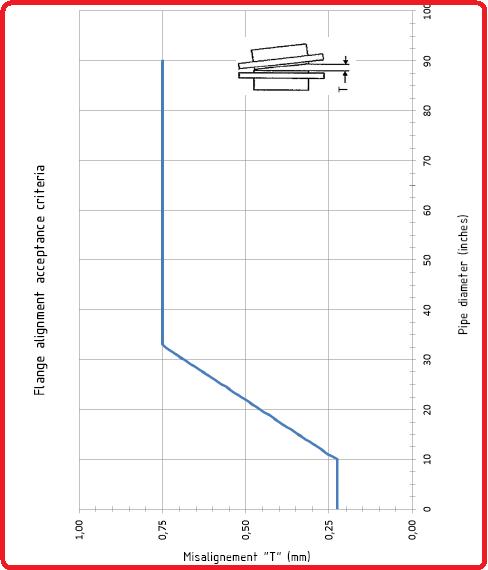
Before fixing the piping flanges on the machine flanges, planes have to be aligned in parallel as shown in Figure 1.
The difference between the maximum and the minimum distance will be a “T” misalignment value, to be checked with the acceptance criteria sheet (see Figure 1). After each adjustment, please check and record the measurements until an acceptable alignment is reached.
Clearance
Check the gasket type, material, and dimension. The distance between flanges should be just enough to insert the gasket by sliding it inside without causing any damage to it and the flange planes.
Concentricity
Check the dimensions of flange hold down bolts and align the relevant holes. Flange bolt holes have to be aligned within a maximum 3 mm offset, and in any case, when flanges are coupled, hold-down bolts should freely slide without any interference through holes.
Piping connections
Preliminary Tests:
Make a visual inspection of the coupled flanges. Surfaces should generally be in good condition; in particular, scratches in radial direction and oxidation are not admitted. As regards flange condition acceptance criteria and detailed prescriptions, please refer to ASME B16.47 and B16.5 procedures.
Connection Sequence
Pipes should not be firmly connected to the machine until final piping supports are installed. In order to avoid any undue stress, piping installation should never start by the machine flange side.
Elastic Support Check
Once the machine flange and piping flange tolerances have been checked, release the elastic supports by removing the locking pins, and make sure pipes remain in position (free to spring around the fixed position).
Connection References
While piping machine tightening activities are carried out, install dial gages on the machine legs in order to monitor any abrupt displacement and the alignment equipment too.
Pre-Tightening Operations:
Starting from one of the pipes to be connected, tighten the four tie rods (staggered tightening) between the machine flange and the relevant piping flange, until an intermediate torque is reached (70%-80% of the torque value indicated in the specification).
Remark: All operations executed until now have to be performed with the machine fixed on the base plate, in order to keep the required position according to the alignment specification.
Intermediate Alignment Check
Release the machine, by unscrewing the fixing screws of the machine axial keys, and by releasing washers (or Belleville washers). Check for any dial gauge range. Verify that the alignment has not changed.
– In case of small alignment variations, some adjustments are admitted only on the horizontal plane. If during the alignment correction, some elastic responses (spring effect) are sensed by the dial gages, it will not be possible to proceed with the final tightening, and piping restoration will be necessary.
– In case of considerable alignment variations it will not be possible to proceed with the final tightening, and piping restoration will be necessary.
Piping Restoration
Piping restoration operations shall consist in displacing pipes by acting on their supports, in order to eliminate forced assembling with the machine (cause of misalignment). If this operation is enough, cutting and welding of the piping will be necessary in order to correct its geometry.
Perform the same Pre-Tightening operations and checks, verify the Intermediate Alignment restoration for all remaining pipes to be connected, make sure the machine is always fixed on the skid during pre-tightening, and do release it before performing the alignment check.
Final Tightening
After reaching the pre-tightened piping condition (70%-80%) and machine-aligned condition, fix again the machine on the skid (by tightening the axial keys and the washers or Belleville washers). Proceed by tightening rods at the final torque values.
Alignment Check
After the final tightening, release the machine; verify the alignment and the DBSE between the machines you are working on and the adjacent machines.
Final Fixing
With the aligned machine and all pipes tightened at the required torque values, proceed with the final arrangement by fixing the machine and/to the skid, as follows:
- – Fix the axial keys, with the required fixing screws, and furthermore (if possible /if foreseen) with welding points.
- – Fix in the required position machine legs to the base plate (or to the proper supports on the base plate) by using the required pins.
- – If calibrated washes are provided, make corrections in order to obtain the required clearance.
Final Alignment Check:
After the final tightening, please verify the Alignment.
Few more Useful Resources for you..
Shaft Alignment Methodology for Compressor and Driver
Connection procedure (Alignment) of Process Piping with Rotating Equipments: An Article
Alignment Check Methodology in Piping Stress Analysis using Caesar II
Few articles related to Pumps
Do you complete the tightening of the flanges with the coupling driver and driven components connected by the spacer of the coupling ?
Unless you have a single bloc unit, not.
You get the pump into the right position vis a vis the piping, then align the driver, then couple it up.
This article very help full,
Let me share, i have experience when compressor not yet align by mechanical, but the piping connection has already install.
The problem come when mechanical team done the alignment one week later, all piping connection become messy and it need to repair due to not match with stress requirement.
My HTF pipe coming out of the pump experienced misalignment with adjacent pipe and have problem to bring the two flanges together. May be I need a base varying spring support to make the levelling first before putting the bolts to hold them together. Am a biginner and facing this problem and a your help. Please send me a procedure to do this job illustrated with figures.
Thanks