
Pump installation with proper methodology is an important activity. Improper pump installation could lead to vibration issues during pump operation. In this article, we will explore the pump installation best practices and pump installation checklists to reduce vibration problems.
What is Pump Installation?
Pump installation can be defined as the procedures or steps required to employ in the placement, alteration, and preparation for the operation of the pump without difficulty. Pump installation refers to the process of setting up and placing a pump system in its intended location, ensuring it is properly connected to the necessary components, and making it ready for operation. The goal of pump installation is to ensure that the pump operates efficiently, safely, and reliably in its intended application. Proper installation is essential to prevent issues such as leaks, vibrations, misalignment, and premature wear, which can lead to pump failure and reduced performance.
Steps for Pump Installation
Installing a pump correctly is essential for its efficient and safe operation. The actual pump installation steps may vary slightly depending on the types and models of pumps. However, in general, the following steps can be followed:
- Step 1: Read the instruction manual thoroughly to understand any specific requirements and guidelines.
- Step 2: Use a rigid, strong, and stable pump foundation. It should be level, secure, and clean of debris.
- Step 3: Install the pump base on the foundation.
- Step 4: In the next step, install the pump and the driver on the baseplate.
- Step 5: Add oil to the proper level in the bearing housings
- Step 6: Check initial pump alignment.
- Step 7: Connect the suction and discharge piping.
- Step 8: Complete a second alignment check, and readjust piping as needed. For long-term operation, proper alignment is critical.
- Step 9: Perform a rotational check of the driver by disengaging the coupling element.
- Step 10: Verify that the pump settings are correct.
- Step 11: Install all ancillary equipment; coupling, and/or insert.
- Step 12: Perform a pre-startup check, valves, electrical connections, etc., and prime the pump
- Step 13: Recheck the pump alignment to ensure that fluid weight in the piping is not causing a misalignment.
- Step 14: Start the pumping unit and verify that the pump is delivering the desired flow rate and pressure by checking pressures, flows, temperature, and other indicators.
- Step 15: If there is any problem, make the necessary adjustments and rerun the pump.
Checklist for Pump Installation
Normally, organizations prepare a pump installation checklist to ensure that all relevant points are taken care of to ascertain the proper working of the pump. Most of such points are normally mentioned in detail in the pump operating manual provided by the pump manufacturer. Those points in the shorter form are listed in the pump installation checklists so that nothing is missed during actual installation time.
A pump installation checklist and best practices will ensure that major checkpoints are taken care of without missing any important considerations. The pump installation checklist is a document that lists in order of preference the considerations one must follow during the installation process. The checklist is usually grouped into various parts like:
- Pump Pre-installation checklist
- Pump Installation checklist
- Pump Start-up checklist, etc
For the proper functioning of the centrifugal pumps in any plant, the following points need to be taken care of while installing.
Checking the site before the pump installation
The engineer should perform the following checks before the pump installation:
- Make sure the foundation concrete is of sufficient strength.
- Only place the pump set on a foundation whose concrete has been set firmly.
- Only place the pump set on a horizontal and level surface.
- Refer to the weights given in the Pump general arrangement (GA) drawing.
- All structural work required must have been prepared in accordance with the dimensions stated in the outline drawing/general arrangement drawing.
Improper pump installation in potentially explosive atmospheres
Pumps required to operate in explosive atmospheres should ensure the following pump installation checks
- Comply with the applicable local explosion protection regulations.
- Observe the information in the datasheet and on the nameplates of the pump and motor.
Installing the pump assembly
Always install the pump set in a horizontal position to ensure proper self-venting of the pump. Refer to Fig. 1:

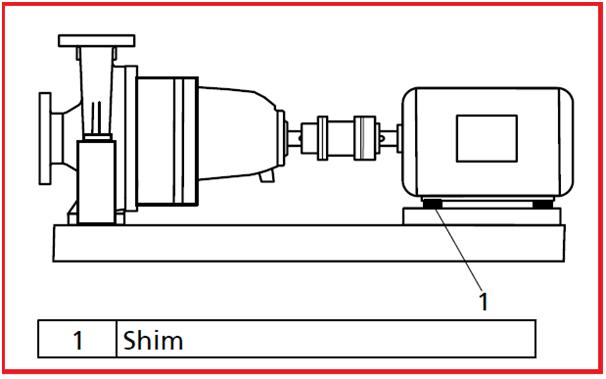
Position the pump on the foundation and use a spirit level to align the shaft and discharge nozzle. Permissible deviation: 0.2 mm/m. If required, use shims (2) to adjust the height. Fit shims between the baseplate/foundation frame and the foundation itself; always insert them to the left and right of the foundation bolts and in close proximity to these bolts.
For a bolt-to-bolt clearance > 800 mm, insert additional shims halfway between the adjoining holes. All shims must lie perfectly flush.
Insert the foundation bolts (4) into the holes provided. Use concrete to set the foundation bolts (4) into the foundation. Wait until the concrete has been set firmly and then align the baseplate. Tighten the foundation bolts (4) evenly and firmly.
Grout the baseplate using low-shrinkage concrete with standard particle size and a water/concrete ratio of ≤ 0.5.
Produce flowability with the help of a solvent.
For low-noise operation, the pump set can be mounted on vibration dampers upon confirmation by the manufacturer. In this case, only fasten the flexible elements at the baseplate after the piping has been connected.
Expansion joints can be fitted between the pump and the suction/discharge line.
Observe the permissible forces and moments at the pump nozzles and Take appropriate measures to compensate for the thermal expansion of the piping.
Check and ensure that the suction lift line/suction headline has been laid with a rising/downward slope towards the pump.
The nominal diameters of the pipelines are at least equal to the nominal diameters of the pump nozzles.
To prevent excessive pressure losses, adapters to larger diameters have a diffuser angle of approximately 8°.
Thoroughly clean, flush, and blow through all vessels, pipelines, and connections (especially of new installations). Before installing the pump in the piping, remove the flange covers on the suction and discharge nozzles of the pump.
Use a filter with laid-in wire mesh (mesh width 0.5 mm, wire diameter 0.25 mm) of corrosion-resistant material. Use a filter three times the diameter of the piping. Conical filters have proved suitable.
The volute casing and casing/discharge cover take on the same temperature as the fluid handled.
Make sure the space between the casing cover/discharge cover and the bearing cover is sufficiently vented. Never close or cover the perforation of the bearing bracket guards. Never insulate the casing cover and the bearing bracket.
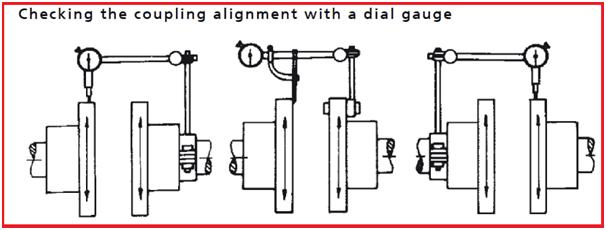
Make sure that the coupling is correctly aligned at all times. Always check the coupling after the pump has been installed and connected to the piping. Also, check the coupling of pump sets supplied with the pump and motor mounted on the same baseplate. Refer to Fig. 2.
Mark the installation position of the coupling by dotting marks (balancing condition).
Remove the coupling spacer. While the pump’s coupling is disengaged, also check the direction of rotation.
Check the alignment of the coupling halves with a dial gauge (see Fig. 2). Admissible run-out of coupling face (axial) maximum 0.1 mm. Admissible radial deviation, measured over the complete circumference, maximum 0.2 mm.
After having installed the pump set and connected the piping, check the coupling alignment and, if required, re-align the pump set (with the motor). Any differences in shaft center height between the pump and the motor are compensated by means of shims.
Check the coupling alignment.
Unscrew the hexagon head bolts at the motor. Insert shims underneath the motor feet until the difference in shaft center height has been compensated. Refer to Fig. 3.
Re-tighten the hexagon head bolts. Check that the coupling and shaft can easily be rotated by hand.
Always operate the pump set with a coupling guard. If the customer specifically requests not to include a coupling guard in the Vendor’s delivery, then the operator must supply one! Observe all relevant regulations for selecting a coupling guard.
Reinstall the coupling guard and step guard, if any. Check the distance between the coupling and the coupling guard. The coupling guard must not touch the coupling.
Check the available mains voltage against the data on the motor nameplate.
Select an appropriate start-up method. Change the motor’s direction of rotation to match that of the pump.
Observe the manufacturer’s product literature supplied with the motor. Never check the direction of rotation by starting up the unfilled pump set. Separate the pump from the motor to check the direction of rotation.
Never insert your hands or any other objects into the pump. Check that the inside of the pump is free from any foreign objects.
The correct direction of rotation of the motor and pump is in the clockwise direction (seen from the motor end). If the direction of rotation is incorrect, check the connection of the motor and the switchgear, if any.
Overall, the pump installation should consider safety as the topmost priority.
Few more Useful Resources for you.
Vibration Related
Pump Related
Piping Design and Layout Basics
Heat Exchanger Related
Vessel Related
While installing the pump ,ensure that no piping load comes to the pump in order to minimise vibration of the pump.
Thank you for sharing that it is important for us to have the proper pumps installed because it will impact the water flow for our home. The other day I noticed that my pipes were leaking and I need to have it repaired. I will definitely hire a professional as they are equipped with the necessary tools and skills to get the job done.
Excellent write up
Good
Gautam Surendra Kumar
What about Shimming plates size? As per API 674, the shimming to be 5mm more than outer edges.
In my opinion, this is not requirement for all directions, any direction to be followed, what is your opinion?
please send us best prices 150 x 150 centrifugal pump 2 pcs