Welding defects can be defined as unacceptable imperfections during the welding process. Any unacceptable deviation with respect to set technical and design requirements in the welding process is termed as welding defects. Various parameters could cause deviation from the ideal welding process as defined by the codes and standards. Wrong welding, human behavior, wrong electrode, poor process condition, improper job preparation, unskilled welder, incorrect weld parameters, etc could be some of such reasons. Defects in Welding can occur at any stage of the welding process and they can easily be detected in form of geometric imperfections. Such weld defects can affect both the inside and outside of the metallic structure.
Various codes and standards like BS EN ISO 6520-1, BS EN ISO 5817, and BS EN ISO 10042 provide acceptable limits for welding irregularities. When any discontinuity exceeds those acceptable code limits they are considered welding defects. It is important that a welding defect is correctly identified so the cause can be established and actions are taken to prevent further occurrence.
Types of Welding Defects / Welding Defect Types
Depending on the location of the Welding defects, they are classified into two groups:
- External Welding Defects and
- Internal Welding Defects.
External welding defects are found on the surface itself and can sometimes be recognized by the naked eye. Surface Cracks, Undercut, Porosity, Overlaps, Craters, Underfill, Spatters, Excessive penetration, Arc Strikes, etc are examples of external welding defects.
Internal welding defects exist in the material at some depth and are hidden from the naked eye. Incomplete penetration, Slag inclusion, Internal porosity, Internal crack, Incomplete fusion, Internal Blowholes, etc are examples of internal welding defects.
In the welding process, both internal and external types of welding defects are quite common. In the next paragraphs, we will explore these types of welding defects in detail.
Welding Defects Crack
Welding defects Crack is an imperfection produced by a local rupture in the solid state arising from the effect of cooling or stresses. Welding Cracks are more significant than other types of welding defects as their geometry produces a very large stress concentration at the crack tip making them prone to cause a fracture.
Welding cracks are normally found in the weld metal, parent metal, or the Heat Affected Zone. Welding Defect cracks can be of various types like:
- Longitudinal.
- Transverse.
- Radiating.
- Crater (found only in the weld metal)
- Branching.
Welding defect cracks can be of various shapes and sizes and may appear on the surface or at any depth or even at the root. The main reason for the crack is the localized stress exceeds the UTS of that material.
Depending on their nature, these welding cracks can be:
- Hot cracks
- Cold cracks
- Lamellar tearing.
Hot Cracks:
Hot cracks normally occur during the solidification stage; which means soon after welding. Depending on their location and mode of occurrence, hot cracks can be of two types:
- Solidification cracks: They occur in the weld metal during the solidification process.
- Liquation cracks: They occur in the coarse grain HAZ, as a result of elevated temperature heating of the material that causes liquation of the low melting point constituents on the grain boundaries.
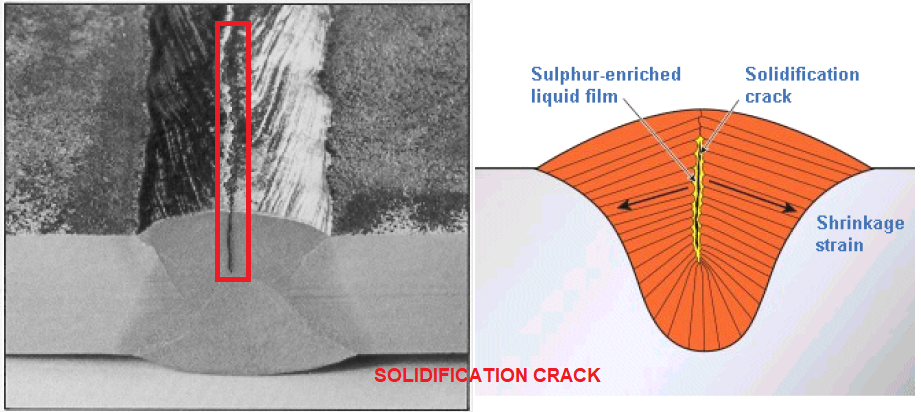
Solidification cracking (Fig. 1) normally occurs when:
- Weld metal possesses high carbon or impurity content.
- The solidifying weld bead has a larger depth-to-width ratio (deep and narrow).
- Heat Flow disruption occurs.
The cracks can be wide and open and possibly narrow. Solidification cracking occurs in compositions having a wide freezing temperature range. For steels, solidification cracks occur due to the presence of high carbon content and impurity elements like sulfur and phosphorus. During solidification, these elements segregate such that intergranular liquid films remain once the bulk of the weld has solidified. The thermal shrinkage of the cooling weld bead can cause these to rupture and form a crack.
Cold Cracks:
Cold cracks occur after the weld metal solidification in the grain-coarsened region of the HAZ. They are also known as delayed cracking as they can normally develop after several days of welding. It lies parallel to the fusion boundary and its path is usually a combination of inter and transgranular cracking.
The direction of the principal residual tensile stress can result in the cracks causing the crack path to grow progressively away from the fusion boundary towards a region of lower sensitivity to hydrogen cracking. When this happens, the crack growth rate decreases and eventually arrests.
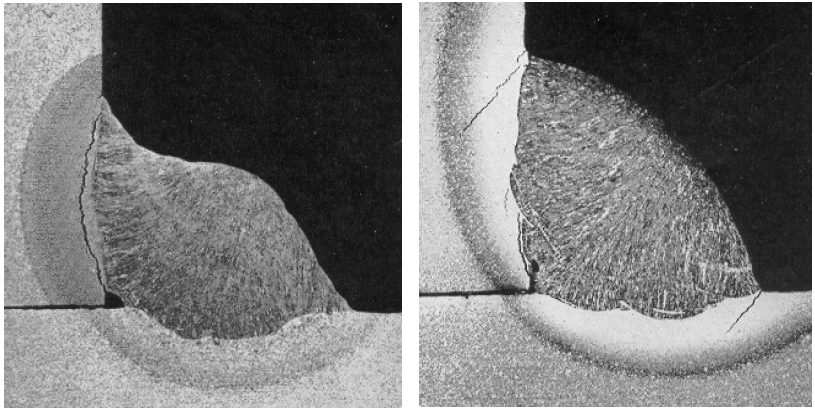
The main causes of Cold cracks (Fig. 2) are Lack of preheating, Low temperature, high stresses, susceptible material structure, high hydrogen content, etc.
Lamellar tearing:
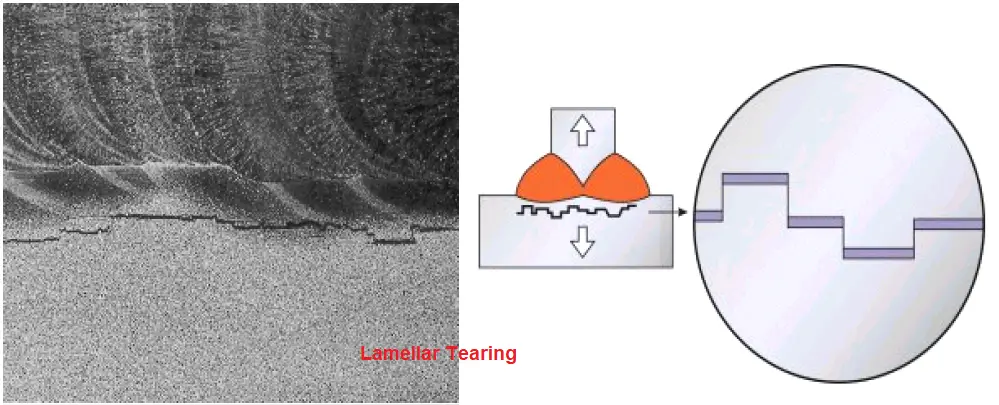
Lamellar tearing normally occurs in rolled steel plates. They are distinguished by the cracking feature having a terraced appearance. Lamellar Cracking occurs in joints where:
- A thermal contraction strain can occur in the through-thickness direction of the steel plate.
- The possibility of non-metallic inclusions as very thin platelets with their principal planes parallel to the plate surface is high.
Welding Defects Undercut
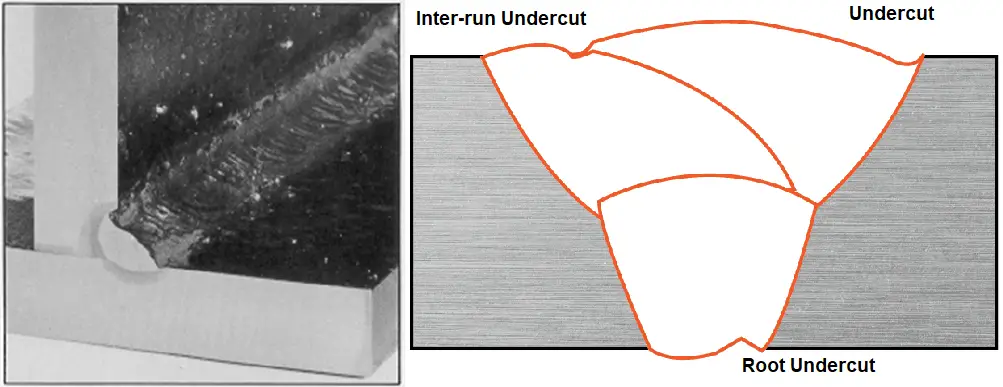
Undercuts are welding defects that present themselves as irregular narrow grooves on the parent metal. They are characterized by their depth, length, and sharpness. The undercut runs parallel to the weld metal and acts as a stress raiser during fatigue loading due to the weakened section. Welding defects Undercut is of three types; Continuous undercut, Intermediate undercut, and Inter-run undercut.
Causes of Undercuts
Probable causes of undercut welding defects are
- Melting of the top edge due to fast weld speed or high voltage.
- High arc voltage.
- Too large electrode; Incorrect electrode angle.
- Use of wrong filler metal.
- Incorrect shielding gas selection.
- Excessive weaving
Remedies/Prevention of Welding undercut
The following steps should be exercised to prevent the possibility of undercut welding defects.
- Decrease the travel speed, Reduce the power input.
- Use the right electrode size with correct positioning; between 30 to 45 degrees angle.
- Reduce the length of the arc and lower the voltage.
- Weld in flat positions.
- Use proper current with attention to thinner areas and edges.
- Use the correct gas mixture based on material type and thickness.
Heat input must be controlled during weld repairs of undercut welding defects.
Welding Defects Porosity
Welding Defect Porosity is caused by the entrapment of gas or air bubbles in the weld metal. These trapped gases collapse over time and weaken the weld section. They can be localized or uniformly distributed. Depending on the Porosity formations they are of various types:
- Gas Porosity
- Worm Holes
- Surface Porosity
Gas Porosity:
Gas porosity is a small cavity of spherical shape generated in the weld metal due to the trapped gases. They are of various forms like Isolated; Uniformly distributed porosity, Surface pore, Localized Clustered porosity; Elongated cavity, or Linear porosity.
Worm Holes:
Sometimes, during solidification, the trapped gas can form tubular or elongated cavities which are known as Wormholes. They can appear singly or in groups over the weld surface. Progressive entrapment of gas between the solidifying metal crystals causes wormholes.
Surface Porosity:
Porosities that break the surface are known as surface porosities. They are similar to uniform porosities.

Causes of Porosity
Major causes of welding defect porosity are:
- The electrode is not well coated / Corroded Electrode
- Presence of oil, grease, hydrocarbon, water, or rust on the weld surface.
- Use of incorrect shielding gas or improper shielding or air entrapment.
- Too high gas flow/ Too great arc voltage
- Gas evolution due to improper surface treatment.
Prevention or Remedies of Porosity:
To reduce the formation of welding defect porosity the following remedial actions can be taken:
- Clean the weld surface and materials; Ensure that the prepared surface is free from oil, rust, or other contaminants.
- Use of dry, good-quality electrodes.
- Optimize the welding process to allow gases to escape.
- The gas flow meter is to be configured with the correct flow settings.
Welding Defects Overlap
Welding defect overlap occurs when the weld pool overflows on the welding surface of the parent metal. In such a scenario, the molten metal does not fuse with the base metal.
Causes of Overlaps:
- Large weld deposition in one go.
- Poor electrode manipulation; Wrong electrode coating.
- Using the electrode at the wrong angle.
- High current/Heat Input.
- Incorrect Weld positioning.
- Longer arc.
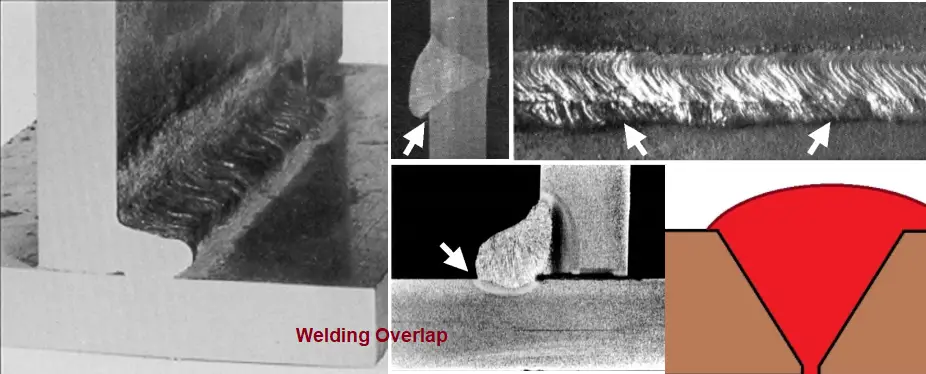
Remedies of Overlap:
- Use the correct welding technique to avoid the wrong arc length.
- Position the electrode at the appropriate angle.
- Change to a flat position.
- Use correct deposition during each run; Correct Electrode Coating
- Use low welding current; Low heat input.
Welding Defects Solid Inclusions
Various solid particles may be included during the welding process. These welding defects are known as solid inclusions. They can be of various types as listed below:
- Slag inclusion
- Oxide inclusion
- Flux inclusion
- Metallic inclusion
- Tungsten
- Copper
- Other Metal
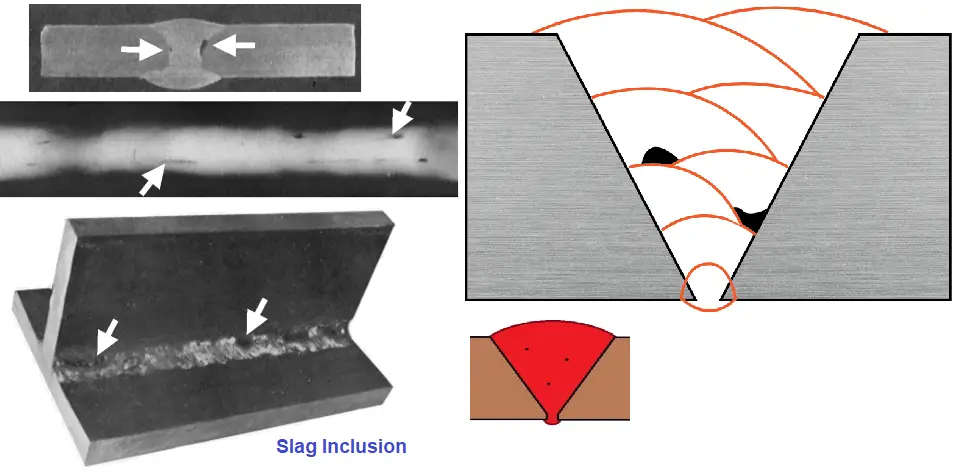
Welding Defect Lack of Fusion
Welding defect lack of fusion arises due to incomplete fusion between the weld metal with the parent metal. Lack of fusion is also known as Cold lapping or cold shuts. Lack of fusion is an internal welding defect, but it can occur on the external surface too. Lack of fusion can be categorized into three groups:
- Lack of sidewall fusion
- Lack of inter-run fusion and
- Lack of root fusion
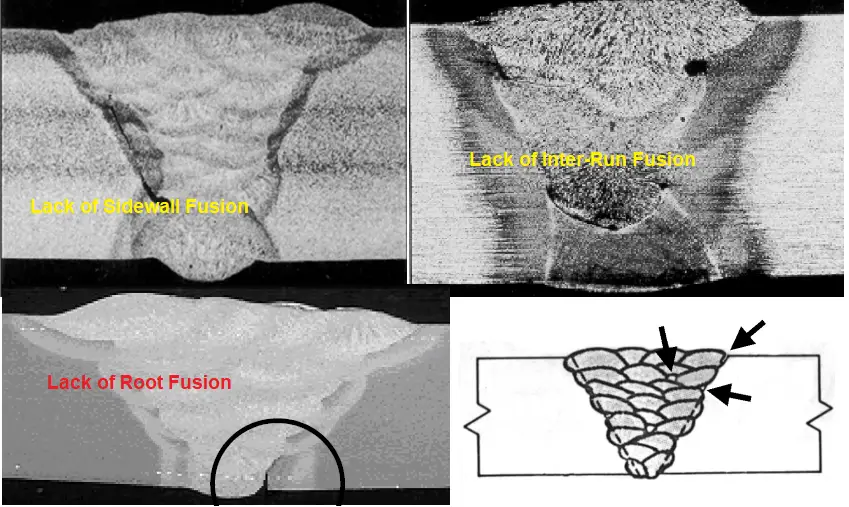
Causes for welding defect Incomplete or Lack of fusion:
The following parameters can contribute to the lack of fusion welding defects:
- Low heat input/Low Arc current
- Wrong electrode diameter with respect to the material thickness.
- High travel speed.
- Large Weld Pool.
- Improper bead placement.
- Oxide or Scale in weld preparation.
- Large Root Face/Small root gap/Excessive root misalignment
Remedies/Prevention of Lack Of Fusion:
To prevent or reduce the possibility of incomplete fusion the following steps can be followed:
- Reduce travel speed.
- Appropriate bead positioning.
- Maintaining Correct root gaps.
- Increase current or heat input.
- Inprove edge preparation.
Welding Defect Lack of Penetration
When the weld metal doesn’t completely penetrate the joint, It creates the weld defect known as lack of penetration or incomplete penetration. As the weld depth is not sufficient, this zone will be highly stressed and can fail easily. They are of two types; Incomplete penetration and Incomplete root Penetration.
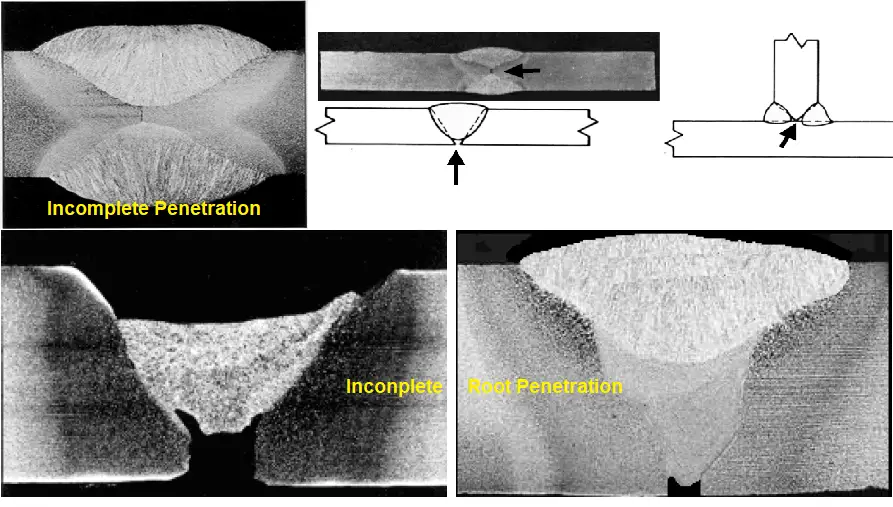
Causes behind Lack of Penetration welding defects:
- Excessive thick root face.
- Root gap is too small
- Fast travel speed
- Use of vertically down welding
- Low heat input
- Too large electrode
Prevention of welding defect Incomplete Penetration:
- Reduce Electrode Size
- Proper joint preparation i.e. providing a suitable root gap.
- Proper heat input
- Correct travel speed
- Vertical up procedure
Welding Defects Spatter
Spatters as welding defects are small globular weld metal droplets expelled during the welding process and stuck to the base metal surface.
Reasons For Spatter:
- High Welding current can cause this defect.
- Damp Electrodes.
- The longer the arc the more chances of getting this defect.
- Magnetic Arc Blow.
- Incorrect polarity.
- Improper gas shields may also cause this defect.
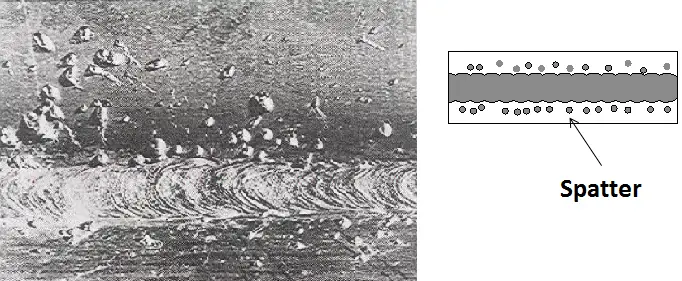
Remedies for Spatter:
- Reduce the arc length and welding current
- Use dry electrodes.
- Using the right polarity and according to the conditions of the welding.
- Use of AC power.
- Increasing the plate angle and using proper gas shielding.
However, Spatter does not affect the weld integrity and can be easily removed by brushes.
Welding Defects Distortion
The excessive heat during the welding process creates distortion. This welding defect is usually found on thinner welding plates where the surface area is not sufficient to dissipate the heat. Due to excess heat, the shape gets changed and hence the name distortion.
Causes of Distortion:
The common causes of distortion are:
- Varying temperature gradient.
- Thin weld plate
- Slow arc travel speed
- A large number of weld pass
How to Prevent Weld Distortion?
- Using a weldable metal type.
- Optimizing the number of weld passes.
- Suitable welding method depending on the metal.
Welding Defect Arc Strike
Arc Strike is usually caused by improper workmanship. When a welder accidentally strikes the electrode or the electrode holder against the work, unwanted arcs are generated adjacent to the weld. These spots are known as “arc strikes” which can initiate failure during bending or cyclic loading.
Remedies: Care must be exercised during welding. The repair can be done by chipping.
Welding Defect Burn Through
Burn-through creates holes in the parent metal.
Causes:
- Excessive root gap
- Excessive weld current
- Insufficient root face
Remedies:
- Keeping proper root gap.
- Controlling the weld current.
- Can be repaired by removing the hole and re-weld and then PWHT
Welding Defect Convex and Concave Weld
This type of welding defect is characterized by misshaped welds; usually convex or concave shapes. The main reason that causes convex and concave welding defects are welding using incorrect speed and electrode current. Using optimal welding current and proper electrode size this type of weld defect can be prevented from occurring.
Welding Defects Excessive Penetration
Excessive penetration is a type of welding defect generated due to high penetration through the joints. It creates notches on the weld surface where high-stress concentration takes place.
Welding Defects Blow Holes
When the generated gas during welding can not escape before molten metal solidification, this type of weld defects form. They are characterized by spherical cavities inside the bead. This is a surface defect.
Welding Defect Shrinkage Cavity
This is the cavity formed by the weld metal shrinkage during solidification.
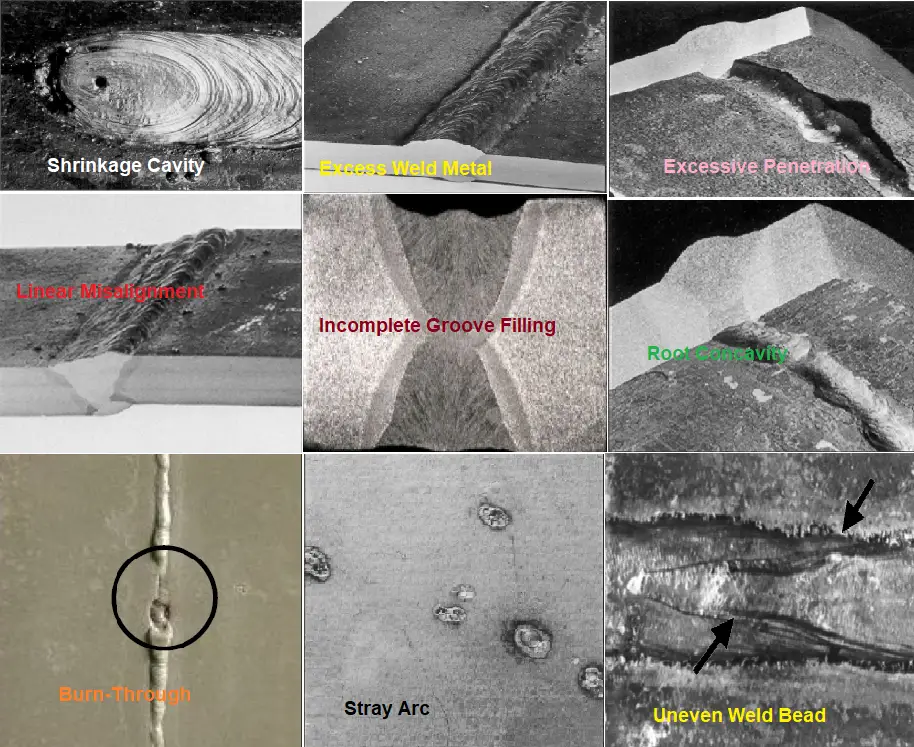
Other Welding defects
There are some other welding defects as mentioned below:
- Warpage
- Excess weld Metal
- Linear Misalignment
- Irregular Width
- Root Concavity
- Stray Arc
- Torn Surface
- Incorrect profile
- Grinding Mark
- Under-flushing
- Chipping Mark, etc
Fig. 11 shows a few of those welding defects.
Few more welding articles for you.
Welding Galvanized Steel
Overview of Pipeline Welding
Welding Positions: Pipe Welding Positions
Welding Defects: Defects in Welding: Types of Welding Defects
Welding Inspector: CSWIP and AWS-CWI
General requirements for Field Welding
Underwater Welding & Inspection Overview
Methods for Welding Stainless Steel
Weld Acceptance Criteria for Completed Welds
To understand the acceptance criteria for completed welds, one should refer to the governing welding code and standards. For example, Table 341.3.2 of ASME B31.3 (Fig. 12) provides the Acceptance Criteria for welding for Process Piping. For pressure vessels, the acceptance criteria for welding are provided in ASME BPVC Section VIII, Div 1.
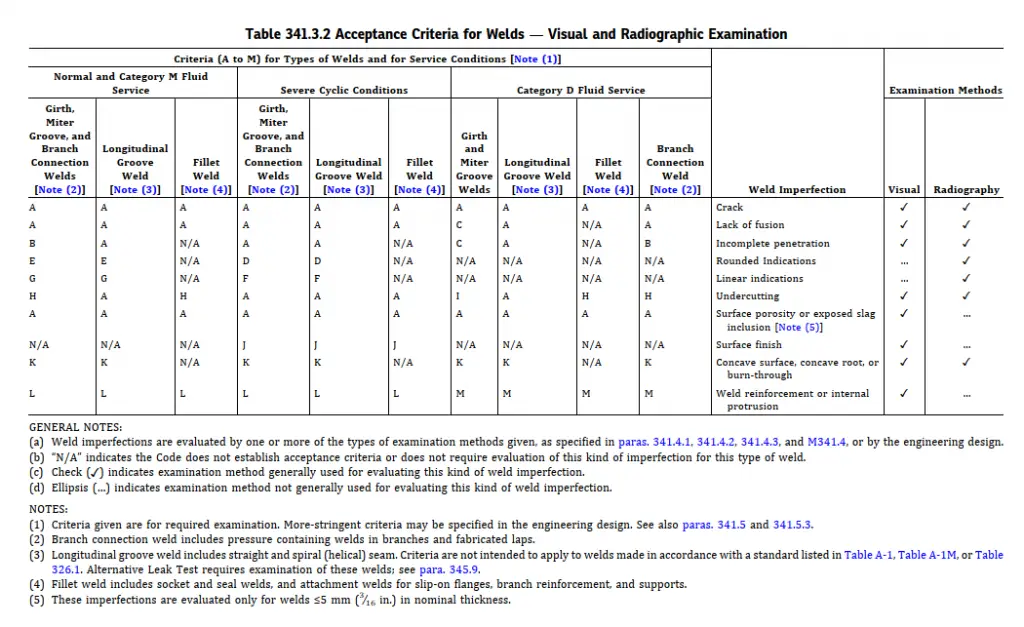
However, in general, the following points should be noted for the acceptance criteria of piping welds:
- Crack is not permitted.
- Weld surfaces free from overlaps, abrupt ridges, and valleys are permitted.
- Reinforcement thickness shall not exceed 3/16 inches.
- Undercuts shall not exceed 1/32 in. or 12.5% of the wall thickness whichever is less.
- In the case of single-welded joints, the concavity of the weld root surface should not reduce the total joint thickness (including reinforcement), to less than the nominal thickness of the thinner component being joined.
- For single welded joints, the excess root penetration shall exceed the lesser of 1/8 in. or 5 % of the pipe inside diameter.
- Incomplete root penetration is acceptable if it does not exceed the lesser of 1/32 in. or 20 % of the required thickness, and its extent is not more than 1 ½ in. in any 6 in. lengths of the weld.
- The length of unfused bead or layer areas shall not exceed 20 % of the pipe circumference, or of the total length of the weld, and no more than 1½ inches in any 6 in. lengths of the weld.
Online Welding Courses
To enhance your knowledge regarding welding, the following video courses can be undertaken:

good
Good Day Anup,
I work for a company called IMAB power in south africa and would like to ask if i may use your blog Welding Defects: Defects in Welding: Types of Welding Defects (With PDF), for training purposes?
my email is nico@imab.co.za
thank you
So great